Contact Us


How to install a handheld shower head with hose
In daily life, handheld shower heads have become an integral part of many people’s showering experience. Compared with traditional fixed shower heads, handheld showers provide us with more personalized and convenient shower options through their flexibility and versatility. The unique design of the handheld shower head consists of a detachable spray head and flexible shower hose, allowing the us to control the direction and intensity of the water flow as desired.
Why do more and more people choose to use hand held showerhead? This is not just for its unique showering experience, but also for its convenience in many aspects. Handheld showerheads are not only suitable for a personalized shower experience, but can also be used to clean the bathroom more flexibly to meet the needs of different users, such as the elderly, children or people with special needs. So, how to install a handheld shower head with hose?

The Type to Install Handheld Shower Head with Hose
Many models easily attach to existing shower arms. The short bent pipe that comes out of the wall and connects to the showerhead. The hand shower head can also be installed over the bath tub spout with a special diverter fitting.
There are several types of adapter kits that allow you to turn your existing shower or bathtub into a handheld shower:
1. A standard fitting attaches to the existing shower arm and replaces the old rain showerhead with a flexible shower hose and handheld shower unit that can serve both as a stationary head or a handheld shower.

2. A cross-tee diverter fitting works with the existing showerhead and includes a hose and handheld shower head unit as a secondary shower head. The diverter T-fitting has two outlets, one for connecting the new handheld shower head and shower hose, and the other for connecting the original rain shower head.

3. A bathtub spout diverter valve is commonly used when you want to add shower functionality and there is no existing shower head. Usually, this requires replacing the old tub spout with a new one that has a handheld shower diverter.

What You'll Need
Equipment/Tools:
- Adjustable wrench or channel lock pliers
- Hex wrench (as needed)
- Drill bits and drill bits (if needed)
Material
- Plumbers pipe sealing tape
- Hand shower kit
- Bath spout with diverter (as required)
- A piece of thick cloth or leather (as needed)
How To Install A HandHeld Shower Head With Hose
We’ll discuss three methods on how to install a handheld shower head with a hose. Regardless of the installation method, there are some preparatory steps we need to perform before starting the installation.
1. Before Beginning
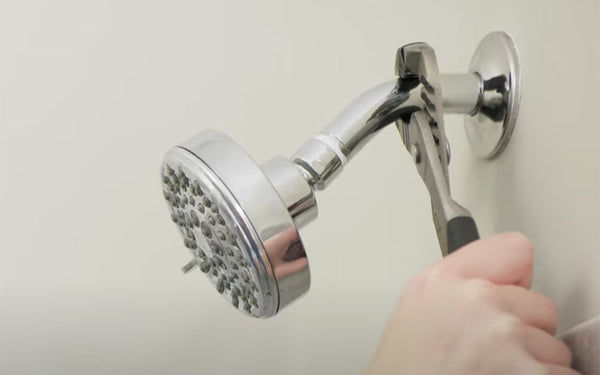
1) Remove the old shower head and clean shower arm
Depending on when the old shower head was installed, you may be able to remove it by hand. If not, you can use an adjustable wrench to unscrew the threads of the shower head in a clockwise and counterclockwise direction.
- Warn:
When you remove the old shower head, be careful not to put pressure on the shower arm that extends from the wall. If it breaks off, it will leave the threads inside the wall fitting and making them very tedious to remove. To avoid this, plumbers recommend using a scissor-type bite device with two wrenches to prevent the remaining pipe from being stressed.
After removing the old shower head, it is important to clean the threads of the shower arm tube.
You need to remove all debris and thread sealing tape. It's also important to check the integrity of your shower head arm pipe to make sure it's not corroded and the threads are still in good condition.
If your rain shower arm looks very worn, you may need to replace the shower arm pipe.
I like to use a microfiber cloth to clean the shower arm threads. It just absorbs a lot of the grit and helps remove the thread sealing tape.
Give it a good wipe down and you're good to go.
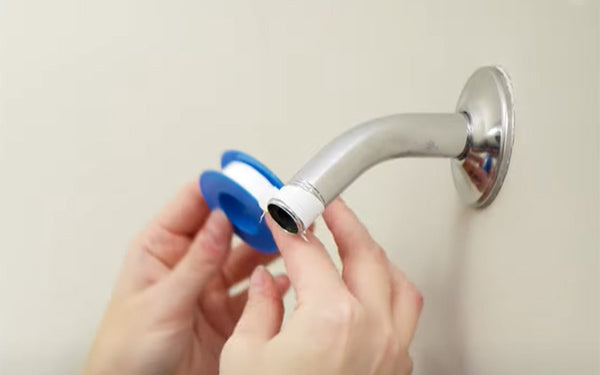
2) Apply new thread sealing tape to the shower arm
Now that you've cleaned the shower arm, it's time to apply new thread sealing tape to ensure a leak-free seal when installing the shower head.
Make sure you apply the thread sealing tape in the same direction as when you install the shower head to the shower arm. So wrap the thread sealing tape around the shower arm pipe in a clockwise direction so it doesn't come apart when you install the shower head.
Starting at the bottom of the pipe, work your way up the threads, making approximately 4 to 5 turns. Finally, use your fingers to smooth the thread sealing tape onto the shower arm threads.
2. Install A HandHeld Shower Head With Hose
1) How to Add a Handheld Showerhead Using a Standard Fitting
With this method, the handheld shower head attaches to the existing shower arm, replacing the old shower head with a flexible hose and hand shower unit. The handheld unit can be screwed onto the end of the new shower head base or mounted on a wall-mounted bracket, depending on the model.
- Part 1: Attach Showerhead Base
Screw the handheld showerhead base onto the shower arm and hand-tighten. Hold the shower arm while doing this and do not overtighten it at this time.

- Part 2: Connect the hose
 Wrap plumber's pipe sealing tape around the exposed threads of the shower head base and screw the flexible shower hose onto it. Tighten it by hand. Attach the sprinkler assembly to the other end of the hose.

- Part 3: Leak Testing
Turn on the faucet and check for leaks. If any connection points leak, carefully tighten with an adjustable wrench or channel lock pliers, using a piece of thick cloth or leather to protect the surface.
- Part 4: Installing the Wall Bracket
If your new shower head assembly has a built-in shower head holder, just plug it in. Otherwise, install the wall bracket according to the manufacturer's instructions. This may require drilling holes into the wall to insert expandable anchors.

The video "How To Install a Handheld Shower Head" from "Twin Home Experts"
2) How to Add a Handheld Shower Using a Cross-Tee Diverter Fitting
This approach adds a handheld shower head but also retains the existing rainfall shower head. It involves temporarily removing the existing shower head and then installing a cross tee fitting with two outlets, one for connecting the new handheld shower head and hose, and one for reconnecting the original overhead shower head.
- Part 1. Install the Cross-Tee Fitting
After removing the existing rain shower head, screw the cross T fitting onto the shower arm. Tighten by hand.
- Part 2. Reconnect the shower head
Wrap plumber's pipe sealing tape around the threads on the cross fitting and screw the original rain shower head onto one of the outlets. Tighten by hand.

- Part 3. Connect the hose
Fasten the flexible hose of the handheld showerhead onto the other outlet on the cross-tee fitting, and tighten by hand.
- Part 4. Connect handheld shower head
Connect the handheld shower head to the other end of the shower hose.

- Part 5. Leak Testing
Turn on the faucet and check for leaks. If any connection point leaks, carefully tighten with an adjustable wrench or channel lock pliers, using a thick piece of cloth or leather to protect the surface.
3) How to Add a Hand-Held Shower Using a Tub Spout Diverter Valve
Where you have no current showerhead at all, you can use a tub spout diverter valve to add a hand-held shower head. Usually, this requires replacing the old tub spout with a new one that has a diverter fitting.
- Part 1. Remove the bathtub spout
First, remove the old bathtub spout.
a. If there is a hex-head setscrew on the spout, it is a slip-on type. Loosen the set screw with a hex key and slide the spout off the stub-out pipe coming out of the wall.
b. If your spout doesn't have a setscrew it is a threaded type. Unscrew the spout counterclockwise, using channel-lock pliers, until it comes off the stub-out pipe.

Warn: Removing a bathtub spout isn't always easy, and things can go wrong quickly. Most bathtub spouts are mounted on brass fittings, pre-cut copper tubing with a male adapter, or a slip fit (straight copper tubing) and are secured by a set screw on the spout. Sometimes, the entire brass joint may twist out of the wall, or the copper may be too tight and twist and break. If you encounter any of these problems, call a professional.
- Part 2. Install a new bath tub spout
Purchase a new diverter-style tub spout that uses the same attachment method as the old one: slip-on or threaded.
a. If the spout is a slip-on design, slide it over the stub-out pipe and tighten the setscrew with a hex key.
b. If your spout is threaded, wrap the pipe threads with two or three clockwise wraps of plumber's pipe-seal tape, then screw it onto the stub-out pipe.

- Part 3. Mount the Slide Bar
Follow the manufacturer's instructions to install the slide bar or shower holder for showerhead to the wall. This may include drilling holes into the wall and attaching brackets with expandable anchors.

- Part 4. Attach the Flexible Hose
Connect the flexible hose to the threads on the spout's diverter valve. Use plumber's pipe sealing tape around the threads to ensure a tight seal. Attach the other end to the shower head unit, again using tape first. Hang the shower head on a shower bracket or sliding shower arm.

- Part 5. Leak Testing
Turn on the water and check components for leaks. If your shower head, hose, or diverter is leaking, carefully tighten the connection with an adjustable wrench or channel-lock pliers, and use a thick piece of cloth or leather to protect the surface.
In Conclusion
Installing a handheld showerhead with a hose can provide a more personalized and convenient shower experience and meet the diverse needs of users. This article outlines three installation methods, each targeting a different scenario. The first method is to replace original rain shower head and mount a handheld shower head to an existing shower arm and to provide flexibility in use. The second method uses a cross-tee diverter fitting that allows the user to keep the original rainfall shower head while adding a handheld shower head. The third method, using a tub spout diverter valve, is suitable for situations where there is no existing shower head and the bathtub spout needs to be replaced.
Before you begin installation, it's crucial to perform preparatory steps, including removing the old shower head, cleaning the shower arms, and applying new thread sealing tape. This article provides detailed step-by-step instructions for each installation method, emphasizing the importance of leak testing to ensure a safe and waterproof connection.
PS: Bostingner offers a wide selection of shower systems and shower parts. Whether you want to upgrade or build a new bathroom, Bostingner shower is a good choice.
FAQ Related to Installing a Handheld Shower Head with a Hose May Include:
Q: Can I install a handheld shower head on any shower arm?
A: Yes, many handheld shower heads are designed to attach to an existing shower arm. However, compatibility may vary, so it is necessary to check product specifications.
Q: Do I need special tools for installation?
A: Basic tools may be needed, such as an adjustable wrench or channel pliers, a hex key, and a drill. The specific tools depend on the installation method selected.
Q: Can I install a hand shower without a shower arm?
A: Yes, this article provides guidance on adding a handheld shower head using a tub spout diverter valve if you don't have an existing shower head.
Q: How to prevent leaks during installation?
A: Applying plumber's pipe sealing tape to the shower arm threads and checking for leaks during installation is a critical step in preventing leaks. There is also an emphasis on careful strengthening of connections.
Q: What if my shower arm is not in good condition?
A: If the shower arm is corroded or damaged, it is recommended to replace it before installing the hand shower head to ensure a secure connection.
Join Our VIP Gourp

Here we will do:
- Provide good after-sales service;
- Do giveaway activities every once in a while;
- You will have the opportunity to experience new products for free;
- We will select people who share good pictures or videos and give them a gift for free.
- Get the latest news of Bostingner, such as discounts, clearance, new product releases, tips, etc.
- Want to join us? Clik this link: Join Bostingner VIP Group
Leave a comment